Author name: nishayadav807757@gmail.com

Uncategorized

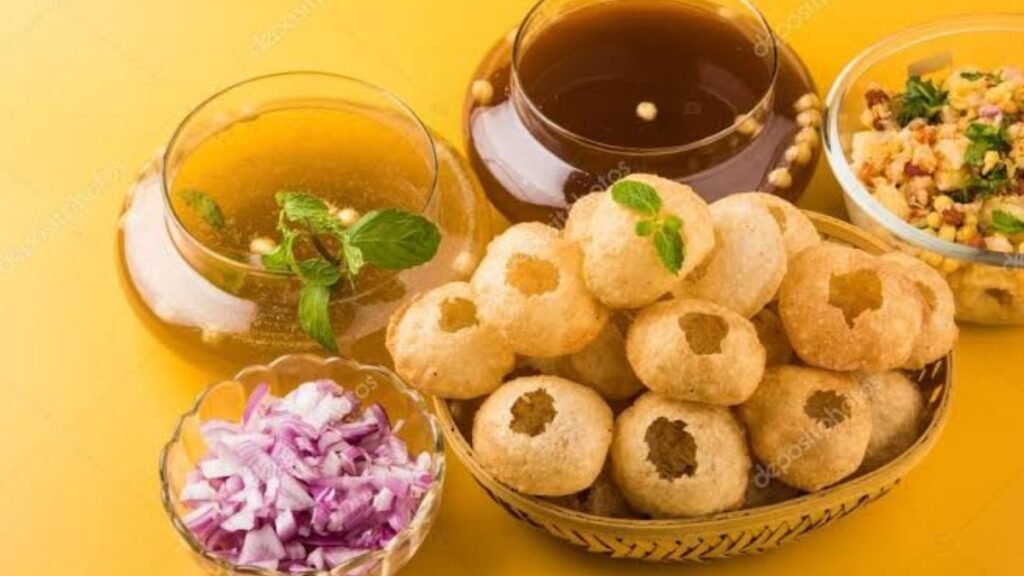
How To Make Street Style Golgappa?

A) Making Golgappa Pani 1. Soak 1 tablespoon of tightly packed tamarind in ¼ cup hot water for about 20 minutes. 2. Take ⅓ cup loosely packed fresh mint leaves in a small grinder jar. Only use the mint leaves. Do not add the stems as then the pani can become bitter. Rinse the mint leaves well with water before adding them to the grinder jar. 3. Add the soaked tamarind along with its water. Make sure there are no seeds in the tamarind. 4. Add the following spices – 1.5 teaspoons cumin seeds, 1 teaspoon fennel, ½ teaspoon black pepper and seeds removed from 1 black cardamom. Discard the outer cardamom cover. To get the seeds, lightly crush the cardamom in a mortar-pestle. Then remove the seeds. 5. Now add 1 teaspoon amchur (dry mango powder), 1 teaspoon chaat masala, 1 pinch asafoetida (hing) and black salt as required. If you do not have dry mango powder, then you can add some lemon juice. Instead of dry mango powder, kachri powder or bel powder can also be used. Instead of black salt, you can use rock salt or sea salt. 6. Grind to a smooth chutney. 7. Take the jaljeera chutney in a bowl. Also add 1.5 cups water. 8. Mix very well. Check the taste of golgappa pani and add more salt and dry mango powder if required. You can also add some lemon juice if you want. If in case the pani tastes bitter (due to the type and quality of mint leaves), then add some lemon juice to balance the bitterness. If you want then you can keep this golgappa pani in the refrigerator. Making golgappa stuffing 9. Rinse and then soak ⅓ cup white chickpeas and ⅓ cup black chickpeas in enough water overnight or for 8 to 9 hours. Later drain all the water and rinse the chickpeas very well in running water. 10. Add the chickpeas in a stovetop pressure cooker. Also add 2.5 cups water. You can also use just one type of chickpea. 11. Add ½ teaspoon salt. 12. Pressure cook on medium heat for 18 to 19 minutes. When pressure settles down on its own in the cooker, then only open the lid and check if the chickpeas are cooked well or not. If not, then pressure cook for some more time till the chickpeas are cooked well. 13. Drain all the water and take the chickpeas in a bowl. 14. In another stovetop pressure cooker, take 2 to 3 medium sized rinsed potatoes. Add enough water just about covering the potatoes. Also add ½ teaspoon salt. Pressure cook them for 5 to 6 whistles or 9 to 11 minutes on medium heat. In the picture below there are more potatoes as I added them in another chaat recipe. 15. When the pressure settles down on its own in the cooker, remove the potatoes. Let them cool a bit. Then peel and chop them. Add the chopped potatoes to the cooked chickpeas. 16. Sprinkle ½ teaspoon Kashmiri red chili powder, ½ teaspoon chaat masala and ¼ teaspoon black salt or add as required. 17. Mix everything well. Keep aside. Assembling golgappa 18. Keep all the elements of golgappa before assembling them – jaljeera pani, tamarind chutney, chana and potatoes stuffing. Take the golgappa puri in a small plate. Crack open the top with a spoon or with clean fingers. 19. Place the chickpeas and potato stuffing inside the golgappa puri. 20. Spoon some sweet tamarind chutney less or more as per your preferences. 21. Now spoon the jaljeera pani or golgappa pani less or more as required. 22. Have them immediately. 23. You can also arrange all the golgappa elements on the dining table and let people make the golgappa for themselves.

PIZZA

How To Make Restaurant Style Pizza?

1. First, in a large bowl mix together 1.5 teaspoons instant yeast and ½ teaspoon of sugar. Usually instant yeast can be mixed directly in the flour or in water at room temperature. But I am detailing this method as it can be implemented if you are using dry active yeast. Add 2 teaspoons dry active yeast for this pizza crust recipe. 2. Add 1 cup of lukewarm water (44 degrees Celsius) and stir. Set aside and let the yeast activate. Tip: The water has to be lukewarm and not hot or cold. Hot water will kill the yeast and cooler water won’t activate the dry active yeast. 3. You should start to see the yeast mixture bubbling up and doubling in size after about 10 to 15 minutes. 4. Combine 1 cup of unbleached all purpose flour (or bread flour) with 1 teaspoon of salt and 3 tablespoons of olive oil. 5. Stir with a whisk or wooden spoon or steel spoon. 6. Add one more cup of the flour. 7. Keep on stirring. The mixture will be quite sticky, like in the photo below. 8. Add the last cup of flour and continue to stir. The dough will start to form and leave the sides of the bowl, but will still be sticky. 9. Now it’s time to knead the dough by hand until it forms a smooth dough. Dust with flour to prevent sticking as you work. The dough will be soft and elastic, and no longer sticky. Tip: If the dough becomes sticky, sprinkle some flour and knead. If the dough looks dry and not smooth, sprinkle a bit of water and knead. 10. Keep your dough in the deep bowl, and lightly apply a bit of olive oil all around the outside of the dough. This will keep it from sticking to the sides of the bowl once the dough proves and grows. Cover loosely with a kitchen napkin or towel, and let rest at room temperature for the dough to leaven: 11. After exactly 1 hour my dough had risen and doubled up to what you see below. If you plan to make the pizza the next day, then wrap the dough tightly in a plastic wrap and keep in the fridge. 12. To make the pizza right away, portion and flatten the dough to a disk. In the below photo, you can see that the dough has leavened well, with stringy strands and many air pockets that will make a chewy crust. Make Pizza Sauce You can easily make a zesty, robust tomato sauce while the dough is resting. The recipe makes for a bigger batch of tomato sauce which you can always refrigerate or freeze. 1. You can choose to either chop the tomatoes (500 grams or 5 to 6 medium tomatoes) and use them fresh to make the sauce, or blanch them first and then add in a blender. Blanching will reduce the cooking time, but is not necessary for making a delicious sauce. 2. Crush the raw or blanched tomatoes in the blender to make a puree that is as smooth or chunky as you like for this pizza recipe. 3. Next, in a large sauce pan heat ¼ cup olive oil, and add 2 teaspoons minced garlic. Sauté and stir for some seconds to soften the garlic. 4. Now add the tomato puree, and mix well. 5. Continue stirring and let the tomatoes cook for 5 minutes. 6. Add salt as needed. Mix and stir. 7. Cover the pan with lid and simmer the tomato sauce on low heat for 20 minutes, stirring occasionally, until the tomatoes have softened. If the sauce looks too thick you can add ¼ cup water. Then cover and continue to cook. 8. Simmer until the tomatoes have completely cooked and the sauce has thickened. 9. Stir in herbs and crushed black pepper. For the pizza sauce seasonings in this recipe, you can add ¼ cup chopped basil (or 3 to 4 teaspoons dried basil), 2 to 3 teaspoons dried oregano (or 2 tablespoons fresh oregano) and fresh crushed black pepper as needed. If you can I recommend using fresh herbs for the boldest Italian flavor. 10. Mix the sauce well and set aside. You can allow the pizza sauce to completely cool and store in an airtight container for up to 10 to 15 days in the fridge, or 3 months in the freezer, and use anytime you’re ready to bake the pizzas. Assemble & Bake Pizza 1. First, preheat the oven to the highest temperature in your oven. In my oven it is 230 degrees Celsius (450 degrees Fahrenheit). Use both the top and bottom heating elements of the oven as we want a uniform and even baking of the pizza. Grease a round metal baking pan with olive oil, and then lightly dust it with maize flour (cornmeal), semolina (rava or sooji) or flour. 2. Divide the homemade pizza dough into equals parts to make either 4 small or 2 large or 3 medium size pizzas. Wrap any dough you’re not using in plastic wrap and keep in the fridge for up to 3 days total. To store in the freezer for up to 3 months, lightly coat the dough in olive oil and seal in an airtight freezer storage bag. 3. Using clean, dry hands, take one portion of the divided dough and roll it into a neat round ball. Place on a cutting board or countertop that’s been lightly coated with some flour, and sprinkle the dough with a light dusting of more flour. 4. Use a rolling pin to roll the dough ball into a large round or oval shape of about ⅛ to ¼ inch thickness. Roll the dough from the center towards the outer edges for the most even pizza dough. You may have to dust the surface with flour as you work. A pizza dough is always stretched with hands and not rolled. Stretching the

KADHI

How To Make Punjabi Kadhi Pakora?

Make Curd Slurry 1. In a bowl take 1.5 cups sour curd or about 375 grams of curd. Whisk it well till smooth. 2. Add 8 tablespoons of gram flour (besan), ½ teaspoon red chilli powder, ½ teaspoon turmeric powder, ½ teaspoon garam masala powder and 1 teaspoon salt to the whisked curd. 3. Stir and mix everything again. 4. Add 3 cups water and stir again. 5. Stir very well to make a smooth mixture without lumps. If there are lumps, then break them with a wired whisk or a spatula or with your fingers. Set the curd slurry aside. You can use a blender to make this mixture, but make sure you don’t over do it. You will get butter instead of a smooth blended curd. Make Pakora For Kadhi 1. Take 1 cup gram flour (besan) in a bowl and add the following ingredients: 2. Add 1 cup thinly sliced onions. About 2 medium to large onions, sliced, approx 150 grams of onions. 3. Mix everything well and keep aside covered for 30 minutes. 4. This will allow the onions to release their water in the mixture. Depending on the water content in the onions, the mixture will become very moist or just about moist. Here’s a photo of the onions after 30 minutes. Mix again. 4. Then accordingly add water as required to make a thick batter. I added ¼ cup water. You can also skip adding water if the mixture is too moist. 6. Heat oil for deep frying in a pan or kadai. You can use any neutral-flavored oil with a high smoking temperature or mustard oil. When the oil becomes medium hot, with a spoon drop the pakora batter in the oil. 7. When the pakora are partly cooked, then turn over with a slotted spoon and continue to fry the other side. 8. Fry till the pakora are crisp and golden turning over a couple of times for even cooking. 9. Remove the fried pakora and place them on a kitchen paper towel so that extra oil is absorbed. Fry the pakora in batches this way. When done keep all of them aside. Make Kadhi Recipe 1. In another pan or kadai, heat 2 tablespoons of mustard oil. Make sure to use a large bottomed pot so that while cooking, the kadhi does not spill. If you don’t have mustard oil, feel free to use any neutral-flavored oil. But the traditional Punjabi kadhi has mustard oil. 2. Add 1 teaspoon cumin seeds, 8 to 10 fenugreek seeds (methi seeds) and a generous pinch of asafoetida (hing). Allow the cumin seeds to crackle and the fenugreek seeds to change their color. Fry on a low flame, so that these spices do not get burnt. 3. Add ⅓ cup chopped onions. Stir and saute for 3 minutes on low to medium-low heat. 4. Then add 1 tablespoon chopped ginger, ¾ to 1 tablespoon chopped garlic and 2 green chillies, chopped. Stir and sauté for a minute. 5. Now add 8 to 10 curry leaves, 2 dry red chilies (halved or broken). 6. Stir and sauté for a minute on a low heat. 7. Then add the curd slurry. 8. Stir very well. 9. Increase the flame to medium and bring the kadhi to a boil. Keep on stirring often so that the bottom does not get browned. Time taken to cook kadhi will be around 14 to 16 minutes. 10. After it comes to a boil, then lower the heat and simmer it for a further 6 to 7 minutes. Do stir at times. The kadhi will thicken as it cooks and simmers. If it becomes too thick, then add some hot water. 11. In the below photo, the kadhi is ready. Make Kadhi Pakora 12. Now add the onion pakora to the kadhi. Stir gently. 13. Cover with a lid and let the onion pakora be soaked in it for 8 to 10 minutes. 14. Lastly, sprinkle some garam masala powder on the Punjabi Kadhi. 15. Garnish with coriander leaves and serve Punjabi Kadhi Pakora hot with steamed rice or jeera rice, topped with few teaspoonfuls of ghee. You could also serve with roti or paratha. However, the combination of Kadhi Chawal (kadhi served with steamed rice) is very popular and tastes very good.

SAMOSA

How To Make Market Style Samosa?

1. The first step is to cook the potatoes and peas for the savory and spiced filling. 2. For the stovetop pressure cooker, remove the lid after all the pressure falls in the cooker. For the Instant Pot, do a quick pressure release after 5 to 7 minutes. Check with a knife or fork to see if the potatoes are cooked well. The knife or fork should be able to slide through easily if the potatoes are cooked properly. If the potatoes are undercooked, then cook them for a few more minutes using the pressure cook function. Once done, drain the potatoes and peas in a colander and set aside to cool.  3Next, roast or toast the spices. This will help to release their flavors and should not be skipped! To a small frying pan over low heat add the following spices: Heat the spices for just a few minutes until aromatic, being careful to not burn. 4. Remove the spices from the heat and allow to cool completely. Then, put them in a spice grinder or small mixer-grinder jar. 5. Grind the toasted spices to a semi-fine powder, and set aside. Tip: If you are pressed for time to roast and grind the spices, then I have a solution for you. Mix 2 teaspoons ground coriander (coriander powder), ½ teaspoon ground cumin (cumin powder), ½ teaspoon ground fennel (fennel powder) and ½ teaspoon garam masala powder in a small bowl. Add this prepared spice mix at step 9 when the green peas and remaining ground spices are added. 6. Peel the skin off of the cooked potatoes, and chop them in ½ to 1 inch cubes. 7. In a small skillet, heat 1 tablespoon oil. When the oil becomes medium hot then reduce the heat to low. Crackle ½ teaspoon cumin seeds until fragrant. I used mustard oil as it really adds a punch in the stuffing. You can use neutral oil like sunflower oil, safflower oil, grapeseed oil or canola oil. 8. Keep the heat on low and add 1 teaspoon finely chopped or minced ginger and 2 teaspoons finely chopped green chillies. Sauté for a few seconds until the raw aroma of ginger goes away. 9. Now you can switch off the flame or keep flame to a low. Then add the cooked green peas, ½ teaspoon red chilli powder, 1 pinch of asafoetida (hing), the dry ground spice mix that we made and 1 to 2 teaspoons dry mango powder (amchur). The mango powder is what gives the Punjabi Samosa filling its signature tangy flavor that balances so well with the savory, spicy flavors of the other stuffing ingredients. 10. Stir together and sauté for a minute. You can add less or more dry mango powder depending upon personal taste. I added 2 teaspoons as just 1 teaspoon was not quite enough sour flavor for me. 11. Next add potato cubes, salt as required and 1 tablespoon chopped coriander leaves (also known as cilantro) to the skillet. 12. Mix very well and sauté for a minute. Check the taste, and add more of the spices, salt or dry mango powder if needed.  Cover and set the filling aside while you make the dough. 13. In a large mixing bowl combine 2 cups all-purpose flour (250 grams), 1 teaspoon carom seeds, 1 teaspoon salt and 6 tablespoons ghee (50 grams). 14. With your fingers, mix the ingredients together until they make a breadcrumb-like texture that holds its shape when you press a portion of the mixture. 15. Then, working just a bit at a time, add in 7 to 8 tablespoons water in parts and knead. You can add 1 to 2 tablespoons extra water if needed if the dough looks floury or dry. 16. Continue kneading to form a firm, tight dough. It should not be soft or sticky. Cover the dough with a moist kitchen towel and let rest for 30 minutes. In case if your dough becomes too moist or sticky then add a few tablespoons of flour. Mix and knead again to a firm dough. 17. After the dough has rested, divide it into 6 to 7 even pieces. Take each piece and gently roll in your palms first to smooth and soften. Place it on your work surface or on the rolling board. 18. Then roll it with a rolling pin, being mindful to keep the thickness even at 1 mm and not too thin. 19. Cut the with a knife or a pastry cutter, right through the center of the rolled pastry dough. 20. Use a rolling pin to gently flatten the half moon shape to make even. 21. Use a pastry brush to lightly brush the dough with water around all of the edges. 22. Next, fold to join the straight edged side together to form a cone, like shown in the photo below. Be sure to press the edges well so that they are sealed! The cone is now ready to be stuffed with the potato and pea filling. 23. Carefully spoon and lightly pack the prepared potato and pea stuffing into the cone. Make sure to not over or under-fill to prevent the samosa from bursting during the frying process. 24. Crimp and pinch the edges to close as shown in photo below. This helps the samosa to stand once made. 25. Evenly press all of the edges, making sure there are no cracks in the dough. The edges should be sealed very well so that the stuffing does not come out while frying. Prepare all the samosa this way as described above, and cover with a moist kitchen napkin to keep them from drying out. The final step to making the best samosa is to fry them to a perfectly crisp golden brown. Use any neutral flavored oil to deep fry – sunflower oil, canola oil, vegetable oil, safflower oil, grapeseed oil are some options. 26. Heat the oil for deep frying in a kadai or pan. Test the oil by adding a small piece of dough – it should come up quickly

BHATURA

How To Make Best Bathure?

1. Sieve the all-purpose flour (maida), salt, baking soda and baking powder in a mixing bowl. Then add the semolina and sugar to the sifted ingredients. 2. Now add the curd (yogurt). With a spoon mix the yogurt with the sifted ingredients. 3. Adding 2 to 3 tablespoons water in parts and at intervals, first mix well and then start kneading. Knead to a smooth, supple and soft dough. 4. Cover the dough with a wet cotton napkin and keep aside to rest for 30 to 45 minutes or up-to 2 hours. 5. Later pinch medium sized balls from the dough. Roll each ball between your palms to a round shape. Keep the dough ball on your work surface and flatten lightly with your fingers. Spread a bit of oil on both sides of the dough ball. Using a rolling pin, roll into an oval or elongated shape. You can also make a round shape. 6. In a kadai or wok, keep oil for deep frying on medium-high flame. Drop the rolled dough in hot oil and it will start puffing within a minute. 7. When the sizzling of the oil stops, turn over and fry the other side. You can flip once or twice for even cooking. 8. When light golden or golden, remove the bhatura and drain on paper towels to remove excess oil. This way fry the bhatura in batches. Serve the Bhatura hot with the chana curry.

CHHOLE

How To Make Perfect Chole?

STEP 1: First rinse 1 cup white chickpeas a couple of times in water. Then soak them in enough water overnight or for 7 to 8 hours. STEP 2: Next day they will double in size. STEP 3: Then drain the water. STEP 4: In a 3 litre pressure cooker add the chickpeas. Also add 3 cups water and ¼ teaspoon salt. I have used a pressure cooker but you can also use a pot or pan. The chickpeas will take a lesser time to cook in the pressure cooker than cooking them in a pot. You can also add a pinch or two of baking soda while cooking them. Addition of baking soda is optional. STEP 5: Pressure cook chickpeas for 10 to 12 whistles or for about 15 to 20 minutes or till they are tender and cooked well. Once the pressure settles down on its own then open the lid of pressure cooker and check if the chickpeas are cooked well or not. It is important to cook them till they are soft and have a melt in the mouth texture. If cooking them in a pan then it can take about an hour or more. Just ensure they are well cooked. Timing to cook chickpeas will depend upon their quality and age. STEP 6: Once done then drain all the water and keep the cooked chickpeas aside. STEP 7: chop 1 medium-sized onion, 2 medium-sized tomatoes, 1 green chili, 4 to 5 medium-sized garlic cloves and 1 inch ginger. STEP 8: Add them to a blender jar. STEP 9: Make a fine paste in a grinder or blender. No need to add water while making the paste as the juice of the tomatoes will help in making the paste. keep the jar aside.  STEP 10: Measure and keep all the ingredients ready for making the gravy. STEP 11: Heat 2 to 3 tablespoons oil in a pan or kadai/wok. STEP 12: Add the following whole garam masala (spices): STEP 13: On low heat fry the whole spices till they are fragrant but don’t burn them. STEP 14: Next add the ground onion-tomato paste. STEP 15: Mix well. 17. Keep stirring often. Sauté for 8 to 10 minutes or more till the oil starts to leave the sides of the masala paste. The paste will also thicken and become glossy.  18. Stir while sautéing so that the paste does not stick to the pan. 19. Then add all the dry spice powders listed below: 20. Mix the spice powders very well and sauté for a minute or two. 21. Then add the cooked chickpeas. 22. Mix well. 23. Pour 1 to 1.5 cups water or add as required. Addition of water depends upon the consistency you want. But don’t add too much water as then the flavors will get diluted. 24. Add salt as required and stir again. 25. Simmer the gravy on a low to medium flame for 12 to 15 minutes or till the gravy thickens. 26. Don’t cover the pan. Stir occasionally. Mash some chickpeas with the back of a spoon. This helps in thickening the gravy. 27. Add 1 slit green chili and 1 teaspoon garam masala powder or chole masala powder. 28. Stir and simmer the gravy for a minute or two. You can keep the consistency from medium to slightly thick to semi dry or dry. If you want a dry consistency then simmer for some more time.  Check the seasoning and add more salt or spice powders if required. Garnish with coriander leaves. You can also garnish with some slit green chilies and ginger julienne. 30. Serve chickpea curry with onion slices, lemon wedges along with bhatura. Enjoy the curry with bhatura. You can also serve this delicious curry with naan or aloo paratha or plain paratha or kulcha or tandoori roti.

CHEESE BALL

How To Make Cheese Ball?

STEP 1: Boil 3 small potatoes (100 grams) in a steamer, pressure cooker or an electric cooker until they are fork tender. You can also steam the potatoes in an Instant Pot for 7 to 8 minutes. Boil the potatoes until they are completely cooked, then drain them well. STEP 2: When the potatoes are cool enough to handle, peel them and mash very well in a mixing bowl. There should be no moisture while peeling, chopping and mashing the potatoes. Allow the potatoes to come at room temperature before you add the remaining ingredients. STEP 3: Grate 60 grams cheese and set aside. 60 grams equals about ½ cup tightly packed grated cheese. You can use either cheddar cheese or processed cheese. If using Amul processed cheese cubes, 3 cubes is sufficient. STEP 4: To the mashed potatoes, add ¼ to ⅓ teaspoon black pepper powder, ½ teaspoon cumin powder, a pinch of garam masala (optional) and 2 tablespoons chopped coriander leaves (cilantro) or parsley leaves. STEP 5: Add 4 tablespoons gram flour (besan) or chickpea flour. I highly recommend using gram flour or chickpea flour, however if you do not have it you can also add 3 to 4 tablespoons all-purpose flour, corn starch or arrowroot flour. STEP 6: Mix very well. STEP 7: Then add the grated cheese and two to three pinches of black salt. Since the cheese already has salt in it, add salt with caution and taste as you go. You can add edible rock salt or regular salt instead of black salt. STEP 8: Mix the cheese with the rest of the potato mixture very well. Check the taste and add more salt or crushed black pepper if required. STEP 9: Make small balls from the mixture, including one tiny ball to test while frying. STEP 10: Heat oil for deep frying in a kadai (wok) or pan. You can use any neutral oil with a high smoking point. STEP 11: When the oil becomes hot, add the tiny tester cheese ball. The temperature of oil can be from 180 to 190 degrees Celsius (356 to 375 degrees Fahrenheit). The oil has to be hot, otherwise, the cheese balls may break. STEP 12: In about one minute, the tiny cheese ball will begin to turn golden. If the tester cheese ball does not break, then you can begin to fry the other balls. If it breaks, then you need to add 1 to 2 tablespoons chickpea flour or gram flour (besan) to the mixture. Make another test ball to ensure that your binding is properly adjusted. TIP: Keep the temperature even while frying by increasing or decreasing the flame as needed. STEP 13: Working in batches, fry the remaining cheese balls. Do not overcrowd. Since I used a small kadai (wok), I added four cheese balls at a time. STEP 14: With a slotted fry spoon, turn them over when they become golden. STEP 15: Continue to fry them while turning a couple of times until they are evenly golden and crisp all over. STEP 16: Remove the fried cheese balls and place them on paper towels to drain. This helps to absorb any extra oil. ENJOY IT….

MUFFINS

How To Make Muffins?

Gather all ingredients. Preheat the oven to 400 degrees F (200 degrees C). Grease a 12-cup muffin tin or line cups with paper liners. STEP 1: Stir flour, baking powder, salt, and sugar together in a large bowl; make a well in the center. STEP 2: Beat egg with a fork in a small bowl or 2-cup measuring cup; whisk in milk and oil. STEP 3: Pour egg mixture all at once into flour mixture; mix quickly and lightly with a fork until just moistened. The batter will be lumpy. STEP 4: Spoon batter into the prepared muffin cups, filling each 3/4 full. STEP 5: Bake in the preheated oven until tops spring back when lightly pressed, about 25 minutes. FINAL STEP: Enjoy!

Scroll to Top